

furrycat's advanced SWAT3 uniform guide
This is my advanced uniform guide which will tell you a few tricks of the trade for reskinning uniforms. Please read at least the tutorial (and preferably some of the documents linked from it) before continuing. Certain tips refer to gsmhacking, a tool for editing SWAT3 mesh and animation files' properties (though not the actual mesh).
Note that I'll add to this from time to time so it may currently look a little empty...
What do all the sections of the textures represent?
If you aren't sure what you're looking at when editing SWT_PARTS.bmp and other "parts" files, open the bitmap in Photoshop or whatever and create a new transparent layer above the original image. Then draw some big, ugly blobs in various colours over the textures. When you start the game you'll be able to see where each part of the image gets mapped to the officer model.
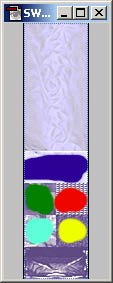
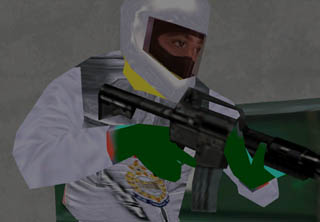
Just delete the extra layer afterwards to continue working on your textures.
What's the deal with transparencies?
To create a transparent section in your uniform, the texture you use must be in Targa format. Photoshop can create Targa files (with the .tga extension) for you. Bits that you want to be transparent must be coloured purple (that is R:255, B:0, G:255).
Be careful: if there is no object underneath the transparent section then you will make a "hole" in your model. For example, if you make part of the standard SWT_ELEM model's helmet transparent you won't see the officer's head sticking up in the gap, you'll just chop off the top of the model. This is because the helmet and head were made as one object in 3D Studio MAX. Without any officer meshes to work with the only way for you to find out where transparency will work correctly is to play about with it.
Alternatively, use gsmhacking to set the transparency of the material
directly:
gsmhacking --material-transparency materialname percentage
I want to change the model
You can't.
If you want, for example, the Operator model with a Delta head you're out of luck. The only way to do this is with 3D Studio and since Sierra haven't released the officer meshes that means doing it from scratch. You'll have to pick the model that best matches what you want to achieve and work from there.
However, with my converted suspect models in your locker you have many more characters to edit than the default SWAT models.
The magic CAMO string
Some .gsm files reference textures with "CAMO" in their name. For example, SWT_DELTA_HIGH.GSM has (amongst others) SWT_CAMO_PARTS.bmp. This does not mean the game looks for a bitmap named SWT_CAMO_PARTS.bmp (although just to confuse you there are files in swatdata1.res with CAMO in their name).
What actually happens is that the game substitutes a different name according to the camo you chose in Ops. So if you select the default Navy Blue camo the game actually looks for SWT_NAVY_PARTS.bmp and if you select 3 Colour Desert the game looks for SWT_3C_PARTS.bmp.
Since the game dumps in an ugly green and white blob in place of any textures it can't find you need to be aware of this and either use it to your advantage by creating different camos or rename the bitmaps to something not involving the magic CAMO string.
Magic material names
If you use gsmhacking. to look at a GSM file you'll see its list of materials and their properties. In a hex editor, you can see this list immediately after the texture entries. A material's name is more interesting than simply telling you what the faces the material maps on to represent. Certain strings are treating specially by the game engine.
- NAME: if a material in a character model is called NAME, the game will write the character's (ie your) name on to the area covered by this texture.
- VISOR: if a material in a character model is called VISOR, the game will substitute whatever texture name is defined for that material with SWT_xxx_VISOR.bmp where xxx is the colour of your team: GRAY for element leaders, RED and BLUE for red and blue teams and also the DM colours GREEN, GRN, GRY, ORANGE, OR, PINK, PURPLE, PUR, YELLOW and YEL.
- FACE: if a material in a character model is called FACE, the game will substitute the appropriate texture for the character's face, for example SWT_WHTBLU_FACE.bmp for the white, blue-eyed officer. Furthermore, the expression map skinname_EXP.bmp will be applied to this material.
- LARM/RARM: if a material in a character model is called LARM or RARM, the game will susbtitute the appropriate texture name for the character's left and right arms respectively, for example SWT_ARMS_WHT.bmp for the white officer.
- HANDGUN: if a material in a character model is called HANDGUN, it will be interpreted as representing a character's holstered secondary weapon. The material will thus be hidden when the character draws his secondary.
- FLASHLIGHT: if a material in a weapon model is called FLASHLIGHT, the game will draw a corona at its location when the weapon's flashlight is activated.
- MUZZLE: if a material in a weapon model is called MUZZLE, the game will draw a muzzle flash sprite at its location when the weapon is fired.
To change a material's name: gsmhacking --material-name oldname newname file.gsm
You can set multiple materials to the same name but this is pointless as the game only treats the first one magically.
Adding sleeves
If you can't figure out why your attempts to put sleeves on a sleeveless model are failing, check the GSM file carefully. The officer's arms are defined in SWT_WHTBLU_ARMS.bmp etc. You must replace these filenames.
But that's not all. As the previous section hints, you may also need to change the material name from LARM or RARM to something else.
Why are officers' helmets shiny?
Because they use reflection maps instead of the usual diffuse maps. See for yourself:
gsmhacking --describe --verbose swt_swt3_high.gsm
Materials: 19
Material 00 at 0xf398: HELMET
Maps: 1
Map 00: reflection map of SWT_HELMET.bmp (#00)
Feedback
As usual, you can send feedback to swat3@furrycat.net. If you need extra help, feel free to ask but remember to tell me what you've read and exactly what it is you didn't understand. That way I can make the guide better. Mails asking "Can you tell me how to make mods?" will be ignored with extreme prejudice.