GSkin export plugins for Maya
Features
GSM export plugin
The GSM export plugin offers the following features:
Vertex blending for smooth skinned models.
Diffuse and reflection mapped materials.
Preservation of SWAT3 bone and material names.
Hit detection.
Grippers.
It does not handle:
Layered shaders.
Some features are not available or behave differently in Maya 6 compared to Maya 2008 and later. See Maya 6 compatibility.
GSA export plugin
The GSA export plugin supports:
All Maya animation techniques.
Root joint translation.
It does not handle:
Frame position/orientation.
Events (use gsmhacking).
Gripper template plugin
The gripper template plugin offers a MEL command to:
Create pistol grip (grip1/grip3) templates.
Create throwable (grip2) templates.
Create grippers (for characters).
Create grips (for objects).
Preparing your character model for export
Use one of the default skeletons as a guide to building your model. You do not have to combine your meshes if you don't wish to. The plugin can handle multiple geometries linked to your skeleton.
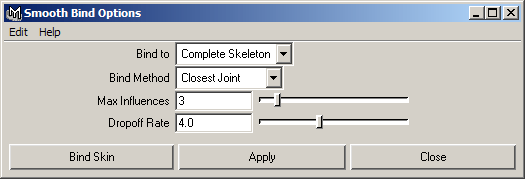
When you are ready to export, first bind all the meshes in your model to the skeleton using a smooth bind with a maximum of three influences.
Preparing your weapon model for export
Create two joints, placing the first at the origin. By convention the first joint is usually named Rifle_Root but it doesn't matter what you call it. Bind all the meshes in your model to the root joint using a rigid bind.
Binding the skeleton
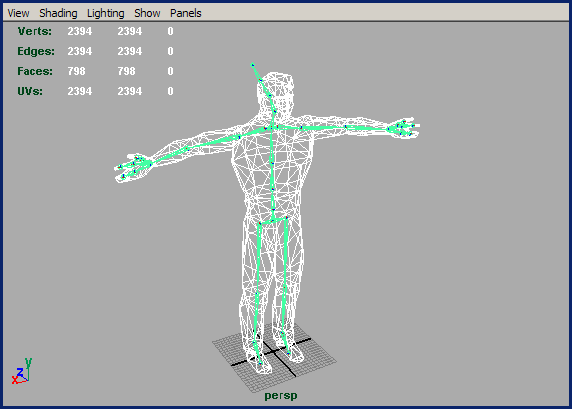
For characters, select all the geometries and your skeleton:
Choose Skin / Bind Skin / Smooth Bind options from the Animation menu:

Make sure that Max Influences is set to 3 or lower.
Maya will now calculate the skin binding. Test that your model doesn't deform horribly by rotating some joints about. Use the Paint Skin Weights Tool to adjust joint influences if necessary. Refer to the Maya documentation for more details on character rigging.
For weapons, use Skin / Bind Skin / Rigid Bind and ensure that only the root joint influences your meshes.
Converting materials
All triangles in all meshes that you wish to export must have a material applied. If you wish the triangles to be visible you must make sure that their material has a texture too. The plugin can differentiate between two types of material. Any triangles mapped with a Lambert shader will be exported with a diffuse texture mapping. This is the standard type of texture seen on most SWAT3 models. Triangles mapped with a Reflection shader (and its subclasses, including Phong and Blinn) will be exported with the reflection mapping used to give the shiny effect seen, for example, on officers' helmets.
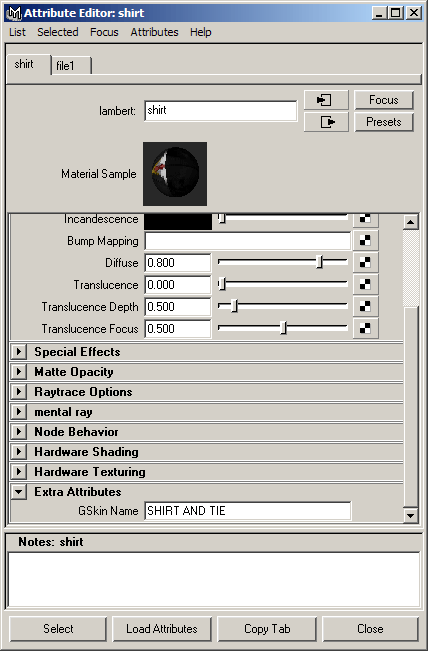
Material names are significant in SWAT3. By default the plugin will export the name of your material but this may cause problems if you want to use a material name that isn't a valid Maya object name or if the name is already taken by another object in the scene.
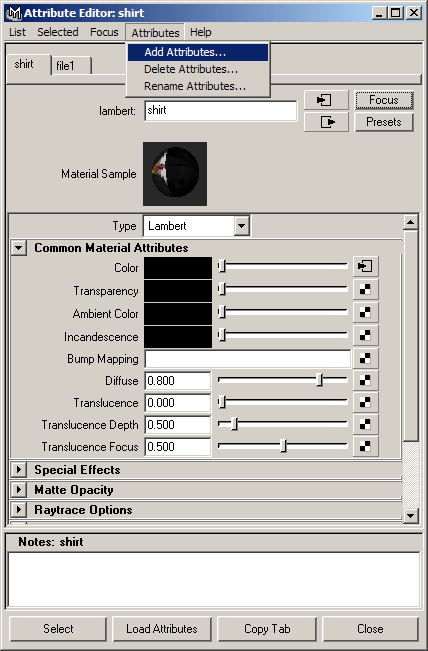
To solve this problem, select your material (for example in Hypershade) and open the Attribute Editor.
Choose Add Attributes from the Attributes menu:
Make a new String attribute called GSkinName:
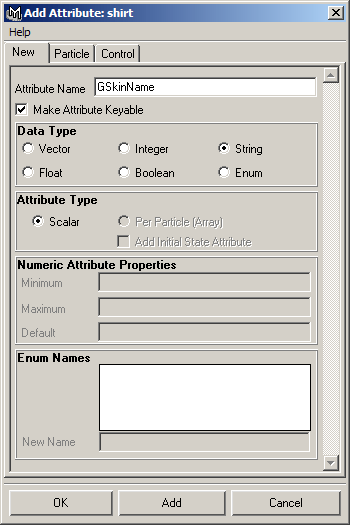
After returning to the Attribute Editor you can scroll to the bottom of the attribute list and find the new GSkinName attribute under Extra Attributes. Set it to whatever you want your material's name to be.
Hit detection
See also the Maya 6 compability section.
To apply hit detection to your model you must colour vertices in a specific colour set. To do this, select your mesh(es), right click and open the Color Set Editor from the Colors menu. Then create a new set named GSkinHitDetect of type RGBA. Use the Paint Vertex Color Tool or Apply Color from the Color menu of the Color Set Editor with the colour set active to apply colours to your vertices as described in the ModHQ FAQ.
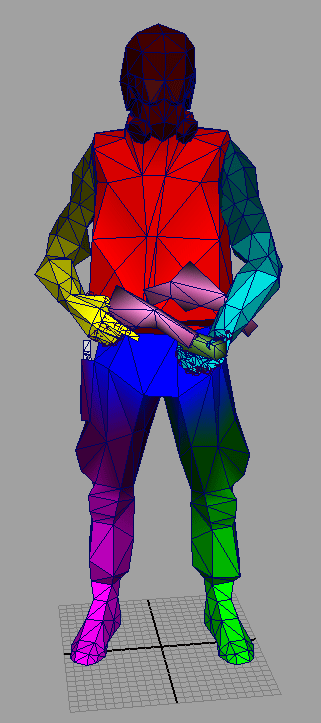
To disable hit detection for a vertex, paint it black.
Gripper templates
Use the gripper template plugin to create gripper templates for your models. The plugin adds the gripperTemplate MEL command. Its syntax is as follows:
gripperTemplate -t <type> -s <shape> <name>
Use type grip for objects or gripper for characters.
Use shape grip for a pistolgrip shape and throwable for an throwable object shape.
Typically you would create grippers for a character as follows:
gripperTemplate -t gripper -s grip Grip1

gripperTemplate -t gripper -s throwable Grip2

gripperTemplate -t gripper -s grip Grip3
Grip1 is for the weapon hand. Grip2 is for throwables. Grip3 is for link to chest - it describes where to sling a primary weapon when the character is using a secondary.
Typically you would create grippers for a weapon as follows:
gripperTemplate -t grip -s grip Grip1

gripperTemplate -t grip -s grip Grip3
Exporting
Simply select Export All from the File menu to save your model. Choose the GSkinMeshExport file type. If you receive an error from Maya about an unrecognised file format and you have definitely loaded the export plugin, try opening the export options menu and choosing the file type from there.
If you do not add any grippers to your character the plugin will create default grippers according to the number of bones in your skeleton. Unless your model has very weird geometry (and you plan on entirely replacing the game's animations) this is usually good enough.
Errors
Some error messages you may receive:
Error: No joints in scene!
You didn't put any joints in the scene. Without a skeleton there can be no model.Error: More than one joint has no parent joint!
You have more than one joint hierarchy. The GSM plugin is not capable of exporting in Export Selected mode so you must delete skeletons you do not wish to export. It is a very good idea to save a new copy of your scene to do this.Error: No skinned meshes in scene!
The plugin didn't find any skin clusters in this scene. This probably means you forgot to bind your skin.Error: Mesh is not triangulated!
The GSM file format only understands triangles. You must triangulate your meshes before exporting.Warning: Triangle in mesh some name has no material assigned and will be ignored!
A triangle is missing a material definition. About the only time I could think that this would happen is if you are trying to convert a model from another 3D file format. In this case you should use a better Maya import plugin.Error writing GSM! write_gsm() returned some number
This is a very bad error message. If you see this please send me your model so I can investigate. But first see the section on memory requirements below.
Prepare for animation export
Before you can export a GSA you must first set up an animation for an appropriate skeleton. A fully rigged SWT class skeleton is provided in the reference rig archive. If you wish to create an animation for another type of character your can start from one of the default skeletons but note that it will almost always be easier to make your animation for the SWT skeleton and use gsmhacking to convert to the required class.
You can use any techniques supported by Maya to create your animation including using IK handles, driven keys, motion capture plugins (hehe) or anything else you can think of.
This plugin handles two types of key: rotation keys of joints and (optional) translation keys of the root joint. Use the latter for moving the character during the animation, for instance when creating a crouching animation.
SWAT3 always plays animations at 10 frames per second. The plugin will save one frame per UI unit. Don't rely on timings when previewing your animation and remember that the first frame to be saved is frame 0.
The length of animation that the plugin will export is determined by the position of the last keyframe you create. If you want to save a 30-frame animation you should set at a keyframe for at least one joint at frame 29 (first frame is frame 0 remember) and delete any later keys.
Exporting an animation
You can save two types of animation with this plugin.
Use Export All to save an animation where all joints which have keys are marked as animated.
Use Export Selected to save an animation where only the selected joints are marked as animated. Don't forget that selecting one joint in a viewport makes the joint's children show up in green but they are not actually selected. Use the Outliner or Hypergraph to select joints for export.
In general it is better to save animation data only for those joints which are the focus of your animation. For example if you were creating a rifle aiming animation you should save only the upper body joints. This is because that particular animation can be used regardless of the character's leg motion and it would not do to have them locked in whichever pose you happened to be using.
Importing an animation
The GSA import plugin can be used to load an existing animation which can then be tweaked and saved out.
Before loading an animation you must create a scene with one (and only one) joint hierarchy containing the same number of bones as the animation you wish to load. The easiest way to do this is to open the correct reference rig for your Maya version or to load a model you created based on the default skeletons.
Once you have a suitable skeleton you can import an animation by using the Import menu. The plugin will set a keyframe for each joint at each frame of the animation. You will probably want to cleanup the graphs before doing any animating.
Importing more animations
If you try to import a GSA with keys already set for some joints, you will get error messages relating to a failure to create animation curves. In order to load a new animation you must first break all existing connections to your skeleton. If you don't know how to do that it might be easier to start again with a new skeleton.
Plugin stability
The GSA import plugin is probably not stable and might cause Maya to crash. Use with caution.
Maya 6 compatibility
Hit detection cannot be modified exactly as described above. Maya 6 does not support Color Sets. Disregard the instructions to create a new Color Set. The Maya 6 GSM exporter will use any vertex colour information available.
Maya 6 does not have a Paint Vertex Color Tool. You will have to use Apply Colors from the Edit Polygons / Colors menu.
Maya 6 will actually display vertex colours by default. You must open the Custom Polygon Display options from the Display menu and ensure that Color in Shaded Display is selected. You will probably also want to ensure that the Objects Affected section of the same settings window is set to All.
Upgrading to Maya 2008 or later is recommended.
Memory requirements
High polycount models can be quite memory intensive especially if your model uses multiple individual meshes. You may see the error "write_gsm() returned some number" if you are short of memory. You can cut down the memory footprint of your model - at the cost of losing any skin weightings you've already set - by carrying out the following steps.
Select all the meshes in your model.
Polygons / Combine
Select all vertices in the mesh.
Edit Polygons / Merge Vertices
Edit / Delete All By Type / History
Bind the skin again.
Feedback
Send any comments to swat3@furrycat.net.
