furrycat's 3D Studio MAX weapon modding tutorial
This is a basic tutorial that aims to get a complete novice up and modelling weapons for SWAT3 in 3D Studio MAX 2.5. In case you've been living under a rock for the last two years I will say now that you must use version 2.5. Not version 2.0. Not version 3.0. Or version 4.0. Or Maya. Or Blender. You must use 3D Studio MAX 2.5. I will not tell you where to get a copy of this software. Do not ask me. I will ignore your email!
I've only just starting using 3DS myself and I have no prior experience so I hope to make this tutorial easy for beginners to follow.
Here's what we're going to do. We'll install the SWAT3 plugins for 3DS, look at how guns work in the game and make the infamous teapot weapon. From there you should be able to go and create your own guns, hopefully much better than mine. I'm no artist!
Before we start
If you're serious about wanting to make models for SWAT3 I heartily recommend you first check out the tutorials for Half-Life at Polycount. You should read at least the first four sections (and follow them!) to get to grips with using 3DS and to understand what bones are and how you apply textures. It took me ages to figure out how to apply textures to my models but it is clearly explained at this site.
It's also a good idea to download the Half-Life SDK 2.0 (linked from Polycount) as it has lots of good stuff in it.

Right, if you're still reading I'll presume you know everything presented above and are ready to start making guns for SWAT3. No problemo. Off we go. The first thing you need to do, of course, is install the plugins from Sierra. You can get these from Sierra's website if you have CQB. They're on the EE CD.
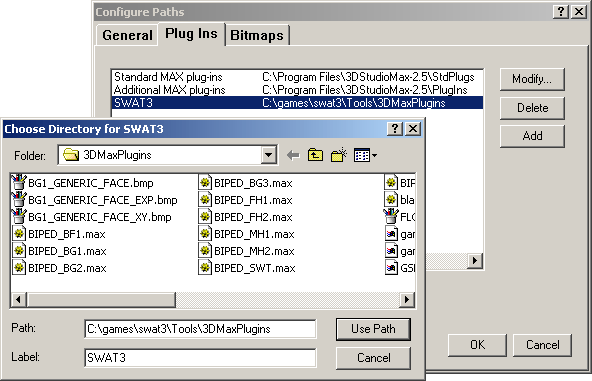
Once you've installed the plugins you need to tell 3DS about them. To do this, go into the File menu and choose Configure Paths. From there, select Plug Ins and click Add. Browse to your SWAT directory. Inside there there is a Tools directory. Inside there there's a directory called 3DMaxPlugins. Go into it and then hit Use Path. Now restart 3DS. To test if you did the above correctly, choose Export from the file menu and select to export as type GSkinMesh (GSM). If the option to export as this type is there it means you successfully configured the plugins.
Jump to a section
| intro | part 1: First steps | part 2: Making the mesh | part 3: Defining materials | part 4: Applying materials | part 5: Exporting the model |


