furrycat's 3D Studio MAX weapon modding tutorial
Making the mesh
Starting off from our template, we already have the bone and grippers. Don't worry, I promised I'd talk about them later and I will do. For now let's concentrate on the obvious bit we're missing: the weapon body.
You can of course spend hours designing a highly elaborate weapon that's modelled in great detail. That comes later. For now, let's make a simple gun and concentrate on exporting it to SWAT.

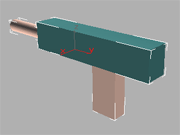
I'm assuming you read the tutorials over at Polycount and have already mastered the basics of creating objects. Knock up a a quick and dirty gun shape in whatever style you like. Here's mine. I'm sure you can do better, but don't take too long over it. What the gun looks like isn't important at this stage.
Next we need the muzzle. Make a simple polygon (a three-sided NGon from the Splines section of the create tool should do the trick) and position it at the end of the barrel of your weapon. This polygon's position defines where the gun's muzzle flash will occur in the game. More technically, the muzzle flash is drawn along the normals to this polygon. Less technically, that means that you must put it where you want to see the bang!
Now we need to convert the gun to a single object. My example here is composed of four objects: a cylinder, two boxes and the muzzle. To make them into one object you can use the Attach function of the Edit Mesh modifier.
Select one of the objects. It doesn't matter all that much which one you choose first but note that the object you attach to it will take the name that the first object had, as well as any UVW (texture) maps, so it's best to attach new objects to existing ones, not existing objects to new ones. In this case it doesn't make any difference. I'll select the big box first.
Now apply an Edit Mesh modifier and make sure that Sub-Object is NOT selected. If it is, it'll show up in yellow and there will be a whole load of options underneath. Your screen should look just as in the screenshot opposite, with only the Attach option available.
Click Attach, so it turns green, then select the other objects one at a time, either by clicking on them directly or by using the Select by Name button. Don't forget to attach the MUZZLE object as well!
Once you've grouped the objects together into a single object you will see one white bounding box around the gun and you can move and rotate the whole gun. Position it so the two grippers you started with cover the handle of the weapon and the bone runs from one end of your weapon to the other.
In the next section I'll show you how to set materials.
Jump to a section
| intro | part 1: First steps | part 2: Making the mesh | part 3: Defining materials | part 4: Applying materials | part 5: Exporting the model |


