furrycat's 3D Studio MAX weapon modding tutorial
First steps

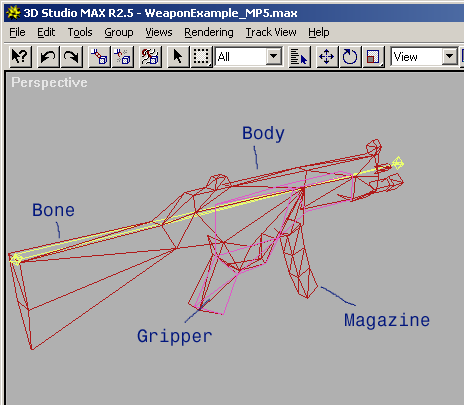
Load up Sierra's MP5 example model from the plugins directory. It's logically composed of seven main parts, of which I've labelled four here.
The weapon body
This, as the name suggests, is the actual body of the gun. As far as the player is concerned when the game starts, the body IS the gun. When you make your model and texture it you are working with the weapon body.
The bone
The player doesn't see the bone but to the game engine it is essential. Without a bone the weapon body is useless. But what is the bone?
Put simply, the bone is an object linked to the weapon that defines how the body moves in the game. In the same way that when you move your arm you actually move the bones in your arm by flexing the attached muscle and the flesh is pulled into place, so the game engine aims the weapon by pointing the bone and the weapon body "comes along for the ride," as Don_T_Shoot would say.
Needless to say, the bone is an important part of the weapon model and must be created in a precise way. We'll talk about this later.
The magazine
In real life a gun's magazine is not part of the gun. It is a detachable object. The same is true in SWAT3. Later on we will see how a weapon's magazine is an entirely separate object from the body of the weapon and how, like the bone, it must be created using the correct techniques.
Two grippers
Weapons in SWAT3 have two "grippers." Although you can only see one in this image because they overlap, there are two. Grippers are textureless objects (and so are invisible) whose sole purpose is to tell the game engine where characters should grip the weapon. That's why they are shaped like pistol grips, to help you visualise where the character's hands will be. You will need to position your grippers relative to the body of the gun so that the characters appear to hold the weapon correctly.
The muzzle
A small object (a single polygon) is required by the game engine to denote the location of the muzzle. After all as far as the game is concerned your weapon is just a bunch of triangles. Correct positioning of the muzzle will allow the game to show your weapon's muzzle flash in the right place.
The flashlight
As with the muzzle, a single polygon is reserved to tell the game engine where to draw the flashlight on your weapon.
Creating a "blank" template

The absolute minimum requirements for your gun are a body with textures, a bone linked to the body, two grippers and a muzzle.
If you wanted to, you could create these every time you started a new project but why not take advantage of the ones Sierra provide for you? Here's how to create a template for a new mod which you can reuse over and over again.
Click the select arrow on the menu bar (highlighted in green in my screenshot) and click on the body of the MP5. It turns white to show that it's selected. Now delete it by hitting delete.
You're left with the two grippers and the bone. Save the scene. Use a different filename or you'll never get the example MP5 back! From now on when I talk about starting a new project I'll assume that you're going to load this scene back in and start off with the grippers and bone.
Next time we'll make the weapon body and link the bone to it...
Jump to a section
| intro | part 1: First steps | part 2: Making the mesh | part 3: Defining materials | part 4: Applying materials | part 5: Exporting the model |


