furrycat's Milkshape weapon modding tutorial
Weapon orientation
The single most important detail of exporting a model from Milkshape for use with SWAT3 is the mesh's orientation in space. Milkshape doesn't know about grippers, which 3D Studio MAX uses to "know" where to make characters hold the weapon. Therefore you must place it in the scene in a certain way. Anyone who ever made mods for Rogue Spear will know what I'm talking about when I say the weapon must be located such that the origin corresponds to the desired position of the operator's hand.
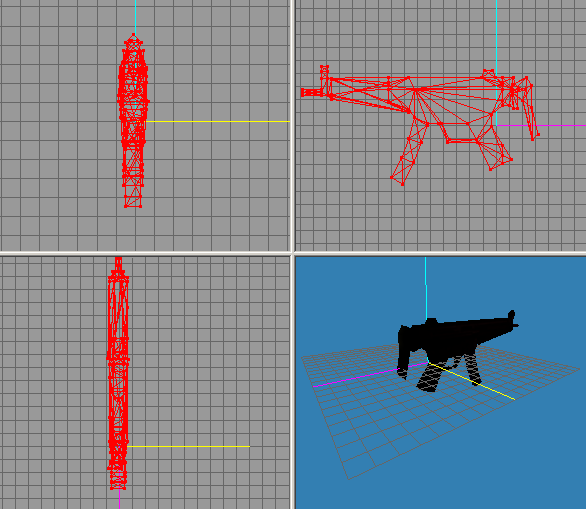
Study the screenshot below very carefully. It's of a correctly-aligned MP5-N.

Axis alignment
As you can see in the shot,
- The purple axis must run parallel to the barrel of the gun, away to the rear of the weapon.
- The blue axis must point up above the body of the gun, parallel to the line through the pistol grip and barrel and up into space.
- The yellow axis must point away from the weapon such that if the weapon were wielded by a right-handed operator he would not be obstructed by the yellow line.
Make sure you understand what this means because you have to align your weapon like that. If you don't ... well feel free to rotate your gun about and see what happens when you export it.
If at first you don't succeed
It shouldn't be hard to see that this isn't an exact science. Chances are your gun won't sit correctly in its operator's hands on your first attempt. I'm afraid the only solution is to come back to this stage and jiggle the mesh about until the results are acceptable.
In the next section I'll talk about materials.
Jump to a section
| intro | part 1: Basic weapon concepts | part 2: Weapon orientation | part 3: Materials | part 4: Bones | part 5: Importing the model with gsmhacking |


